Sunday 27 June 2010

I is for Icy Colours over on the Alphabet Challenge this week


This image could be sooo tacky with black and red costumes, but it turns quite classy with these ice blue tones....a perfect man card that doesn't offend the ladies...at least I hope that's what I achieved here...otherwise I am probably in trouble!

The image is made up from digital images from "charmed Crafts" Maddison was printed out 3 times side by side in her rather riskay outfit and coloured with copic markers. A tiny bit of shimmer was added to the girls' feathers and corsets with a sakura clear star gelly roll pen.

The chosen colours make this perfect for the icy colour alphabet challenge over "here"

Quick prom update...Em's dress is almost finished...just the hem to do...hair and makeup rehearsals this weekend went well..I finished the underskirt today...it's been a bit of an interesting weekend...ended up with 6 teenagers....were only planning 3, best laid plans and all that!

Catch you all later, thanks for visiting...
Sue
x

Wednesday 23 June 2010

Yesteryear and Shoes!


This week Wendy has set the Tanda Teaser and her theme for this challenge is "yesteryear". For my card I've come slightly more up to date than Wendy, all the way to the 1920/30's, don't you think the fashions then were beautiful?!

I stamped the ladies (Artistic Stamper) and shoes (also Artistic Stamper) in Pumice stone Distress Ink and then coloured the images with Copics. The shoes were great as they mean I can enter this into the Shoe challenge over at "Tuesday Taggers" too! I also added a bit of glitz to the girls with Sakura Gelly Roll, Clear Star. This is a great way of adding a bit of glitz, it's subtle...shame really coz you can't see it in the pictures.


The flowers were coloured with Spun Sugar and Victorian Velvet Distress Inks and then I brushed them with pearl medium. I bought the leaves at the Stamp Attic so that's another product from the Wantage trip used.

Prom Dress is coming along..just have to hem the underskirt and hem the main dress...will post a piccy when I have time!

Saturday 19 June 2010

Bitter Sweet Fathers Day


Father's day this year is a bitter sweet occasion...Fil passed away very soon after fathers day was officially over last year so for us, Fathers day has totally different connotations. We just heard that his grave was turfed over and as DH and the kids don't want to visit the grave I decided to get some flowers....I chose some silk flowers because we won't be placing flowers regularly, but I want to show we care. The grave yard is amazing...there are flowers on most of the graves...silk mainly, but it is impressive. I wanted flowers that didn't look totally fake and I had the kids fooled when they saw them so I guess I nailed it!

What was amazing was that the laminated cards we left with the funeral flowers were still intact..the copics had faded, but the messages written in glitter gel pens were still as good as the day we wrote them! I hasten to add..I have laid flowers since the funeral...that just sounded like I hadn't been back.

For my own dad...I hope he has a good day tomorrow....he's not into Fathers day..think's its all a marketing con to make loads of money for the card companies...good thing he's getting a hand made card! lol! He's my rock! my big Man! Happy Fathers Day Dad!

sue
x

Friday 18 June 2010

Totally Awesome!!


Mil phoned on Tuesday to tell me about an awesome field of poppies between Stourport and Kidderminster and thought that I might just like to do a diversion on my way to shopping to see and photograph them..YESSSS! my all time wish to be able to photograph the prefect field of poppies! I couldn't go on Wednesday..due to em having an exam in the middle of the day....but the poppies made the news on the TV on Wednesday night, so that settled it we just had to go...I picked Em and her friend up from school after their re exam, so on the way to Kidder to do the shopping we stopped off in the poppy field on the way...these are some of the pics!...We need a picture of Em for her I tunes single and one of these might just be the one, according to her
.....what do you think?....

The field is managed by the Wildlife Trust check out their web site..www.worcswildlifetrust.co.uk
OK so I'm having serious problems here...can't seem to post the pics I want to..and blogger keeps publishing when I'm trying to upload pictures?..will try again later!

have a good evening!
Sue
x

Tuesday 15 June 2010

I Did It Janet, I Modge Podged!


So this is the last of the Wantage challenges. This was Janet's challenge, she was our special guest of honour. Coming all the way from New Zealand, she set us a challenge connected to New Zealand. this challenge has been worrying me, I wanted to make something special but after a few false starts and almost destroying my whole paula shell napkin, I thought I wasn't going to come up with anything respectable. But thankfully I have managed to make something out of the remaining few inches! Phew!


Yesterday I came across a 4 x 4 canvas for 89p and thought, YES!, that's just what I need to finish this Challenge! Especially with the tiny fragment I had left!


I started off by painting the canvas with acrylic paints over the front and sides, then I modge podged the napkin diagonally across two opposite corners. Next I slathered on some viva ferro paint and stamped into it with my Tanda Klimt swirly border stamp. When this was dry...I smeared the ferro with acrylics and precious metal paint and sprayed with glimmer mist. Once dry I added Stickles and then using Glossy Accents I stuck the Paula shell fragment in the bottom right hand corner and added accent beads to the piece. The next step was to add the seahorse plaque, mentioned in an earlier post, layered up with some mulberry paper (to separate it from the background canvas)


To finish the canvas, I painted the sides with Viva croco paint...this cracked to reveal the acrylic paints and napkin that I painted/stuck around the edges.

Sunday 13 June 2010

Another Fathers Day Card


On Wednesday I found the perfect stamp to make a Fathers Day card for my Husband...he's called Trophy Guy, the stamp, not my husband, and he is from Wild Rose Studio. I coloured the image with Copic markers and distressed the edges with distress ink. The trophy and rosette have been decoupaged and covered with glossy accents. The rattle and shoes have also been coated with glossy accents. The backing papers were bought in Hobby Craft, I cannot remember who they were by. I made the ribbon rosette using two widths of ribbon in co-ordinating colours. I just found a blog for cards for men and their challenge this week is to make a fathers day card, you can find "the challenge here"


Here's hoping that my hubby hasn't found my blog yet!

Catch you all later
Sue
x

Saturday 12 June 2010

G is for Green

This week's letter on the Alphabet challenge is G....and of course G is for Green..but a little bird told me being green could be about recycling...only problem is I just blogged my recycled yeast tin yesterday so that will not count. So this will just have to do....


My Gorjuss girl is coloured with Copic Markers, the background papers are from the Arityicious Decadent Brocade CD Rom, the sentiment was a custom stamp from Tanda and embossing was done in a Cuttlebug embossing folder. I've used various punches and dies including Martha Stewart, SU, Joy and Spellbinders and edges have been distressed with Distress inks.


On the green front, the veg patch is beginning to come together.....here are some pictures.....these are of my beans and courgettes...taken about a week ago before all the rain...they are a little bit bigger now! luckily my water butts have filled up again...they were all empty last weekend! You might just notice the tomato plants too...two plum and 1 Cosack..I have 3 Gardeners Delight and 2 Sungold elsewhere. Tonight our salad was mainly out of the garden...I really recommend Sorrel...it's a hardy perennial, once you get it to germinate it seems to come through quite hard winters...it can be cooked like spinage..(I haven't tried that) or it can be used in salads...it has a fantastic lemony flavour and I thoroughly recommend it!! Doesn't take up much room in the garden too...so it is well worth the initial effort! Once germinated...just keep it well watered and stop it going to seed and you're sorted for years to come!

Friday 11 June 2010

Who's for a makeover?

OK so this is going to be a bit of a mammoth post...lots of steps and lots of photos......and from my previous experiences with blogger this week I could well be bald by the time I get to the end of the post!

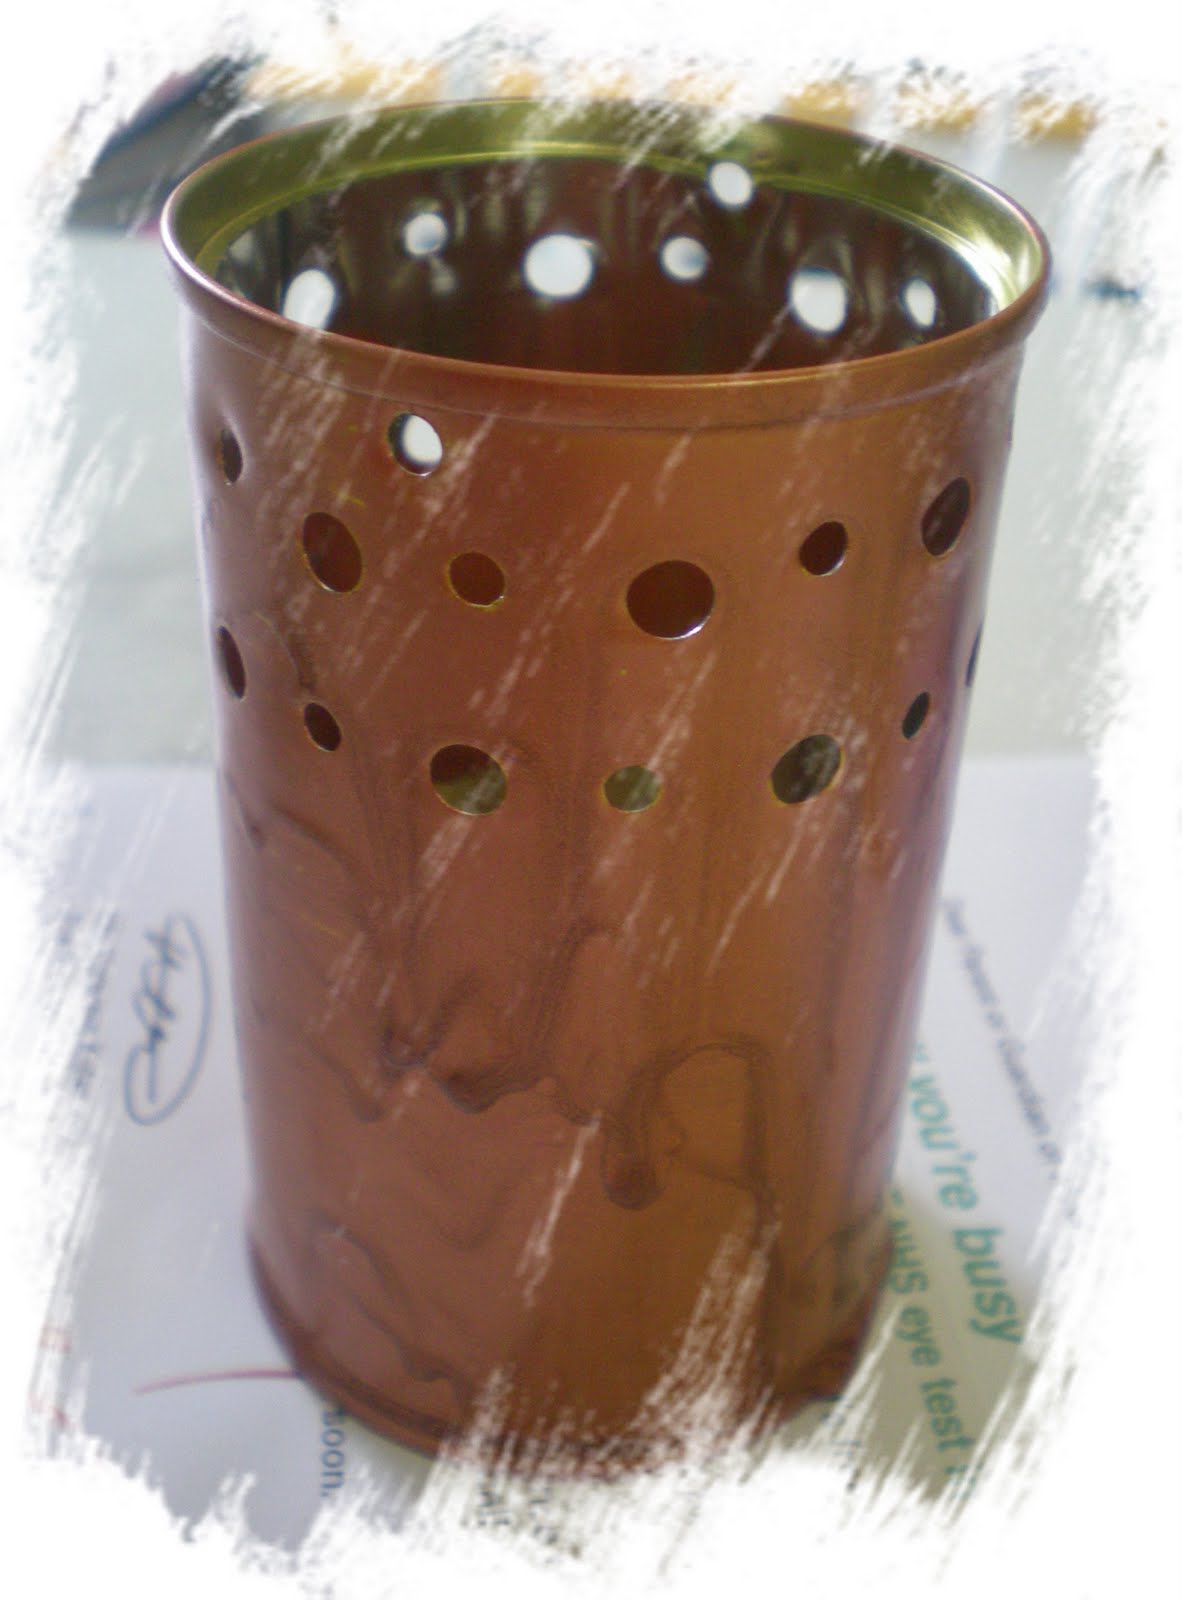
This is where I started...an empty yeast tin...I punched holes around the top of the tin using my Crop-a-dile. Two small ones opposite each other at the very top (these will be used to hang the voltive) then two rows of holes just below....


The next step was to coat the entire tin with copper precious metal paint...don't worry if it runs as this is just the base coat for the crackle paint applied later. Allow this to dry completely.


For the next step I smeared Viva Ferro paint around the middle section of the tin then it rolled over my damp Tanda Klimt border stamp to make an debossed impression in the Ferro paint. I then allowed this to dry. NB it is very important to clean the stamp straight away otherwise it will be completely ruined!


Using my fingers I worked various acrylic paints into the Ferro and finished off with some more precious metal paints again using my fingers again this was allowed to dry


Once this was dry I plastered the bottom section of the tin with a thick layer of Viva Croco paint. Using a spatula I got a reasonable smooth finish this was allowed to dry and crack. Then I plastered more Croco paint around the top of the tin. This time the holes were a little tricky so I decided to to the equivalent of the snow icing on Christmas cakes, you know the one where you bounce the palette knife up and down to deliberately get a rough texture....this way my holes reappeared!


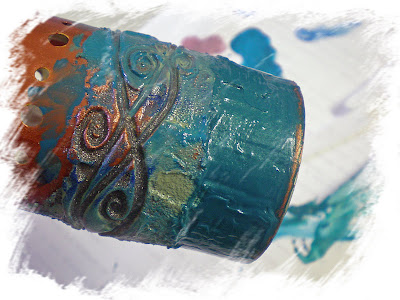
When everything was dry I found that some of the cracks had gone all the way back to the tin in places so I rubbed some more acrylic and precious metal paints into the cracks and then finished off with a few spritzes of glimmer mist. I touched up the rims of the tin with copper precious metal paint and then my tin was ready for the next stage.......


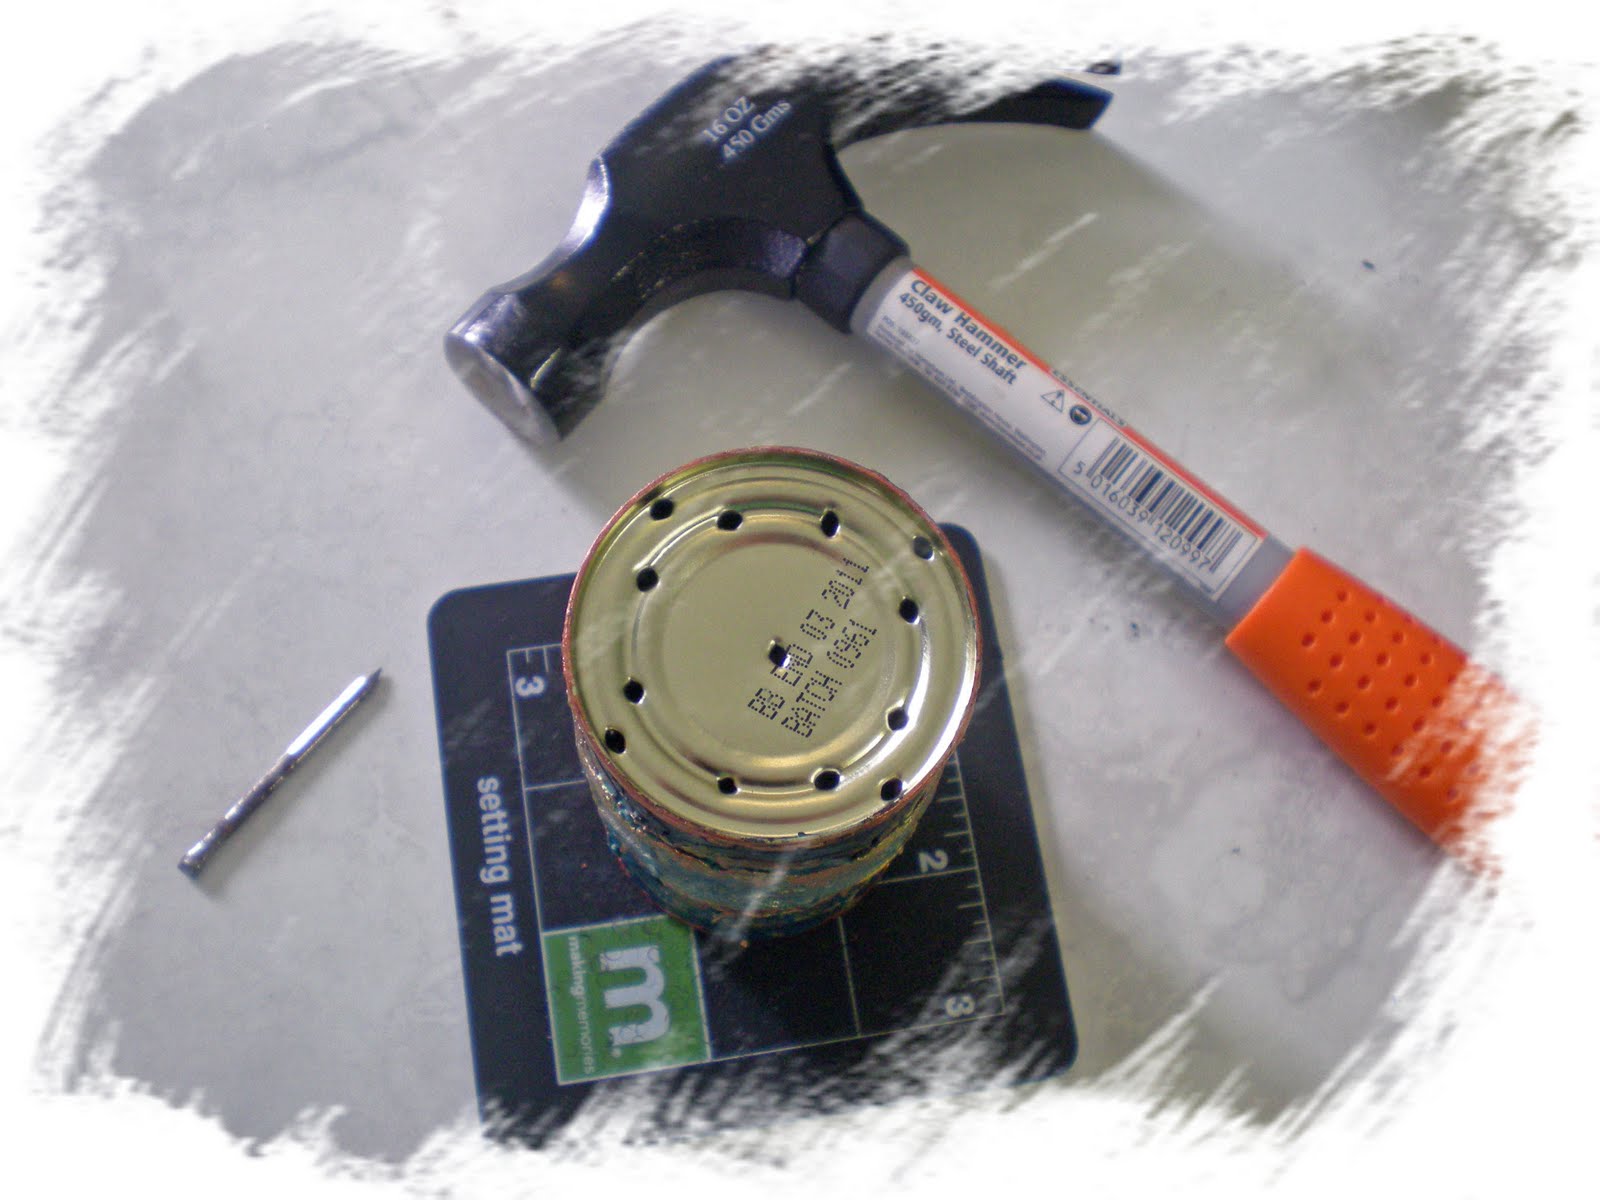
I decided that I probably needed some more holes in my tin so that air could circulate enough to let the night light burn efficiently. I thought that holes in the bottom would allow cool air to be sucked in and the holes at the top would allow the hot air out so I punched some holes using a hammer and a large nail.....


Now it was time to add some more decoration. I threaded some copper lined seed beads onto some fine olive jewellery wire. This was then wrapped and threaded though the top row of holes then tied off inside the tin.


Using a wire jig I bent some thick copper wire in a series of loops to form the handle of the voltive..each time I made a loop, I simply lifted it off the jig and moved it along to make the next loop, this way I got nice even loops. Make sure you make an odd number of loops otherwise your voltive will not hang properly.


I made 7 loops on my handle. Here it is ready to be attached to my tin.....


I passed my wire through the two small holes (already mentioned in step 1) and then wound two more loops on the outside of the tin. I was going to dangle some beads from these two loops but then I changed my mind....


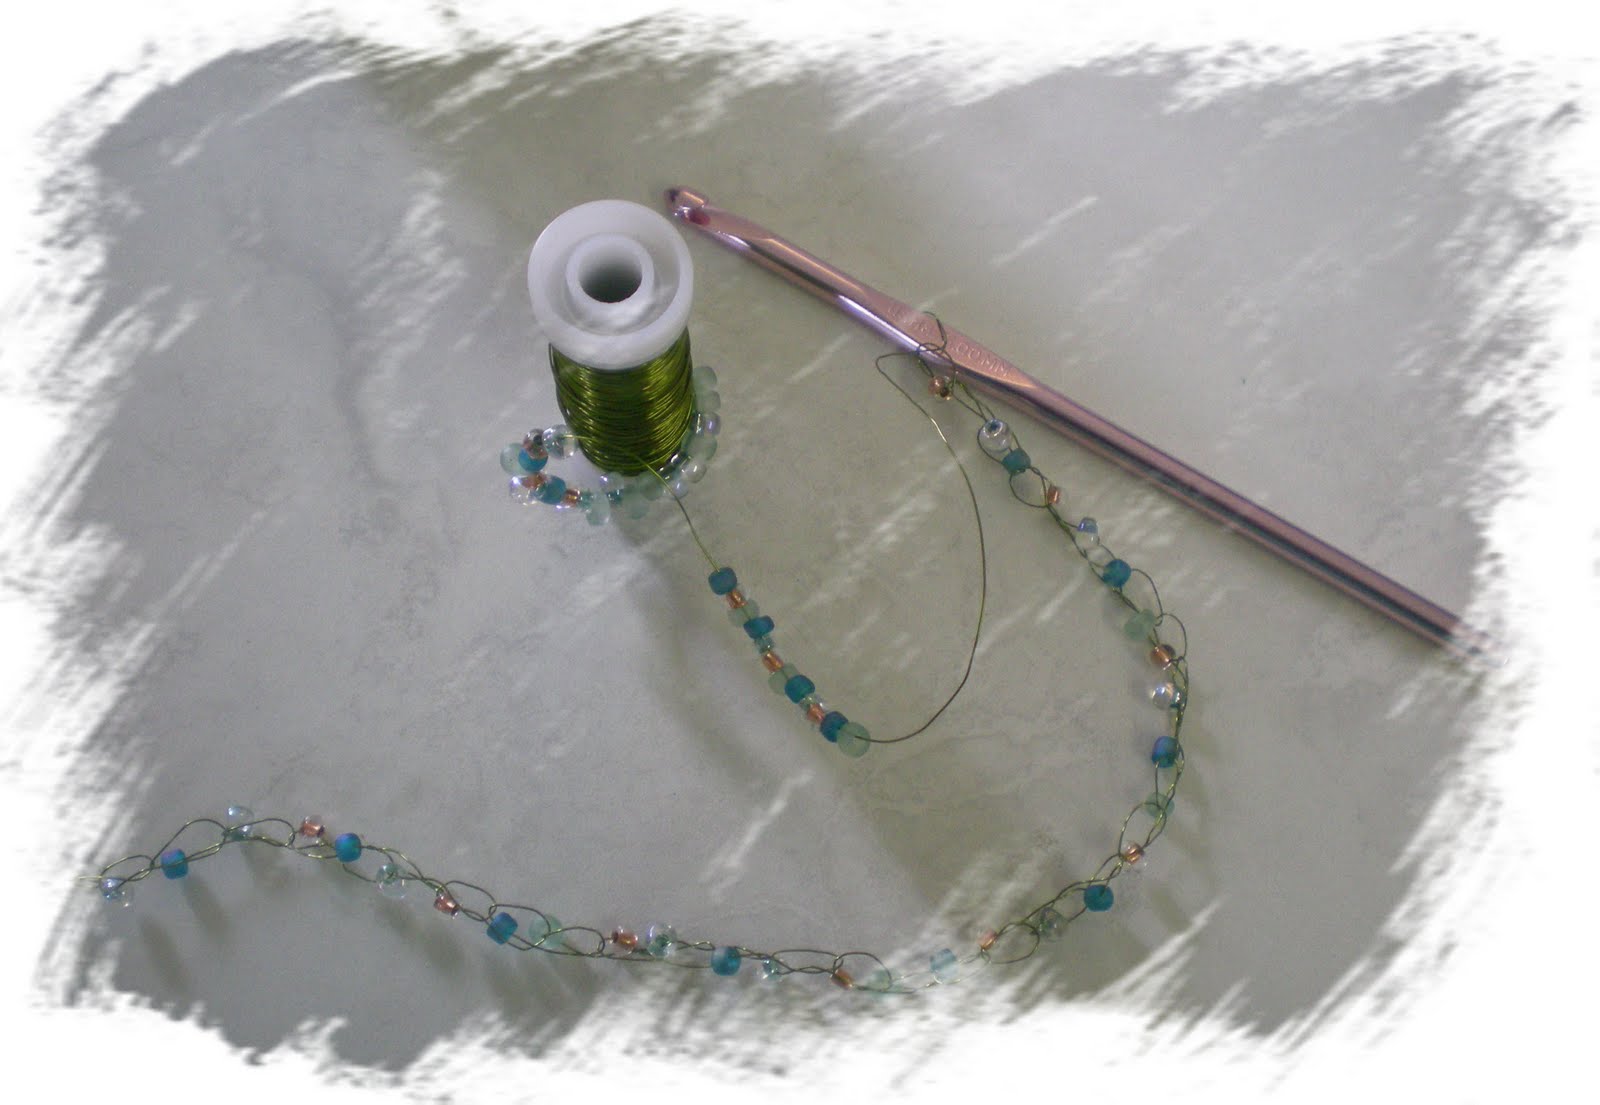
I decided to use my olive jewellery wire and do some crochet....I threaded some pretty co-ordinating beads onto the wire, then using a large crochet hook I did a simple chain stitch pulling a bead into each stitch...


this was then laced through the loops of the handle ....et Voila....a pretty night light, perfect for all the lovely evenings we hope to have this summer...fingers crossed.

I cannot guarantee how weatherproof this will be so I'm keeping mine indoors!

I'm really peased with how this turned out...it was a bit of an experiment and I had no idea how it would turn out from one stage to the next.

I hope that this little project has inspired you to alter a tin of some kind or to use any of the techniques I have used, it would be great to see what other people do with these ideas!

Sue
x

Thursday 10 June 2010

Going all Flowery...not Floury


Anyone who knows me and has followed my blog for a while will know that I make my own bread...so when the Tanda girls got together in Wantage recently, I gave everyone an empty yeast tin to alter/decorate...You've had a little teaser piccy earlier this week and I can report that the step-by-step piccies will be on my blog tomorrow, blogger permitting. I had the ultimate compliment today...my voltive was the first thing my mother-in-law noticed when she came into my kitchen (aka my craft room) today...she thought it was very pretty and didn't realize that I had made it or that it was recycled! I'm feeling pretty chuffed now!


So what is this post about...well, I thought that I should finish off the Stampotique cards that I started colouring at the Wantage meet...I've been working on two other cards today and had some off cuts that would just finish off the Wantage cards so I thought that I may as well punch a load of flowers and leaves and finish the job so to speak.....this would also fit with the "Tuesday Taggers" and the "Spoonfull of Sugar" floral theme for this week so here goes.....I used Copic markers to colour the girls and distress inks to distress the edges and masks to stamp around the images. I happened to be working with backing papers printed from Artylicious Fantasy Floral CD today and decided that they would work well with the Daniel Torrente girls....luckily my maidenhair fern punch is un-jammed and working again


...Patty if you're reading this the megga bang on the floor fixed it! ;) You can see I've used the little spiky flower punch I bought last week for the flower centres too!...I think I should get the larger one too;) will have to save up some more pennies!

My other cards today will have to remain under wraps for now..the first one is for a friend who will be 40 at the weekend and I had to get Andrew to make me a custom stamp to cater for her passion in life...the second one was a card for my Hubby for Father's day...Thanks Patty..the Wild Rose Studio "For Men" Trophy Guy has worked perfectly!

It's late now, so I'd better go and make the sarnies for the girls!

And don't forget to come back tomorrow for the low down on the voltive;)
Sue
x

Wednesday 9 June 2010

Tanda Teaser For the Big Man!


This is the card I've made for my Dad....no he's not fat, he is just my font of all knowledge and hence my big man! He has always loved sailing, but had to give it up when my brother and I appeared on the scene. The love of sailing didn't get passed on to me, despite my Chemistry teacher's best efforts, but it did to my brother who trained as an instructor and can blame crewing on the Tall Ships for finding the love of his life and moving to Boston MA. He's now got two boys and has given up sailing too!

I spotted two Tanda Stamps that I thought would have a lot of potential if they were resized....so I asked Andrew to do just that....The waves can be found on one of the Pirate plates and is tiny...blown up to this size it fits the DL card as a border perfectly...it also has a lovely oriental feel...but more of that in later weeks! The ship is on the Transport set and again works fabulously at this larger size.

The ship was stamped in Distress ink as were the waves...the waves were then coloured using Copic Markers. I also used the waves on the Tag...

I know that not everyone has a father around...I have one less Father's day card this year, so I just want to stress that this is a Man card challenge rather than a Father's day challenge..I hope you have time to join us over on the Tanda Blog and Forum, and look forward to seeing your work!

And just incase this was all getting a bit too man orientated....here are a few more flowers....


Take care
Sue
x

Tuesday 8 June 2010

F is for Flowers and more flowers


Over on the alphabet challenge this week the theme is F for Flowers. Not more flowers I thought and then I remembered that I had just cut up and mounted the large flowers from Graphicus. I've had them for ages and was thinking of selling them (I bought them as part of one of those mega deals, you know, the sort where if you buy a load of stuff you want you get something for free that perhaps you didn't really want) Anyway a few weeks ago, my eldest daughter decided that she wanted to use them for her GCSE Art exam piece so I ended up mounting them all on EZ mount...Having done that I might as well use them myself now I can't sell them as new!


I stamped the flowers onto paper printed from the Arylicious Decadent Brocade CD rom and layered them up with card run through a cuttlebug folder that complimented the flower shape.


The flower petals were curled slightly, distressed and a small amount of glitter added to the edges to give a bit of dimension.


As I mentioned before, my lack of blogging has been down to spending loads of time gardening and also having the kids home for half term...so I just thought that I would share some pictures of the flowers in my garden that I have taken over the last week.......


That's probably enough pics for today...will blog some more tomorrow hopefully!
Sue
x

Monday 7 June 2010

Oh forgot to say....

I almost forgot....one of the reasons why I have tried so hard to take part in this week's Tuesday Taggers challenge is that Zoe is running the challenge this week and because she is offering a fabby prize of Tanda Stamps this week...Well I had no option but to support you guys this week!
Suex

Texture and Tuesday Taggers

Hi there, I seem to have been very busy in the garden over the last week so I'm a little behind on my blogging....I saw on Zoe's blog that this week's Tuesday Taggers Challenge is to make something touchy feely with texture....I thought that this was the perfect excuse to get on with two other challenges, namely my own to my Tanda chums who came to Wantage...
basically to alter/decorate a yeast tin and the other was to make something using the Paula shell tissue and fragments that Janet gave usWell I can now report that I finished my yeast tin this morning, and have to admit that I think it worked really well....so I want to blog it with step by step piccies which is going to take rather a long time me thinks! So just for now here is a sneaky peak....


I haven't finished the other challenge yet,but thought that I would share what I have done so far...basically I stamped the PSX seahorse into Fimo, coated it with mica powder, baked it and then added more colour using precious metal paints.

To give even more texture to the piece and emulate the seaweed that seahorses love to inhabit, I used Croco paint, glitter, stickles, accent beads and copper curls. The piece is still wet so this is as far as I have got....again I suppose watch this spot as I will blog the finished piece/card or whatever it turns out to be..... I still need to use the Paula shell napkin and fragments of course!


Unfortunately, the colours and sparkle don't really show up in these photographs. But here is a close up of the bottom of the piece.....